DDNS with CloudFlare
So this is a pretty simple solution. It will actually take more time reading this, then actually setting it up.
To the point, shall we?
There are other solutions, but this was the method and scripts I used to accomplish this. I will be grabbing the GIT from https://github.com/adrienbrignon/cloudflare-ddns. Honestly, you could probably just follow the README.md found there and get everything working. I did. But I am hoping to take a little more of the guess work out of the picture with this guide.
This guide assumes you already have a domain's DNS being hosted by CloudFlare. I use CloudFlare's free plan and it works super good. I am really stoked about CloudFlare. The tools and services they provide for free is crazy. (Thank you CloudFlare!)
Anyway. Jump on your Linux box. I use CentOS (and will probably have to change soon), but this method should work for most NIX variants.
I will be grabbing the code and using /opt as the working directory. May need a couple tools too, so we will yum those.
Below we will use "pip" to install the requirements. If your on a fresh load of CentOS, you may want to install Python3. I recommend leaving the existing Python in place (mine was Python 2.7) and just running "yum install python3". Then I went ahead and linked pip3 to pip by doing a "ln -s /usr/bin/pip3 /usr/bin/pip". Should be good to go after that.
yum install bind-utils git python

cd /opt

git clone https://github.com/adrienbrignon/cloudflare-ddns.git cfddns
chown -R root.root cfddns

cd /opt/cfddns
chmod +x cloudflare-ddns.py

# install the requirements - they are pyyaml and requests
pip install -r requirements.txt
That should do it for getting the code and installing requirements. Now we need to configure the yml for the domain. Most of the work is already done. We just need to follow suit.
cd zones

mv example.com.yml yourdomain.com.yml

vi yourdomain.com.yml
Edit yourdomain.com.yml
%YAML 1.1
# Cloudflare DDNS example configuration
---

# Your Cloudflare user/email address
cf_email: 'username@cloudflare.com'

# Your Cloudflare API key
# https://support.cloudflare.com/hc/en-us/articles/200167836-Where-do-I-find-my-Cloudflare-API-key
cf_api_key: <your cloudflare api key goes here>

# Cloudflare zone name
# If you're updating 'ddns.example.com' set this to 'example.com'
cf_zone: yourdomain.com

# List of records
# If you're updating 'example.com' record, set its name to '@'.
# Only write the subdomain ('ddns' for 'ddns.example.com')
cf_records:
    - 'www':
        type: A
        proxied: true
    - 'test':
        type: A
        proxied: true
    - 'stuff':
        type: A
        proxied: true
    - 'smoke':
        type: A
        proxied: true
    - 'mirror':
        type: A
        proxied: true

### some additional examples
#    - '@':
#        type: A
#        proxied: true
#        log: ERROR
#    - 'ddns':
#        type: A
#    - 'ddns':
#        type: AAAA
#        ttl: 300
#        proxied: false
#        log: INFO

# This is the method used to discover the server's IP address
# The faster one is 'dig' but it may not be available on your system
# Available methods: 'http' or 'dig'
cf_resolving_method: 'dig'
Ok... now we need to find that API key on CloudFlare... (stealing the next bit from a previous write up)
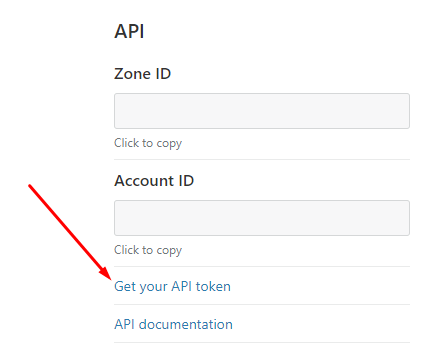
On the "Overview" page of your domain on CloudFlare, on the right hand column down a little ways, you will see the API section.
Click that "Get your API token" link.
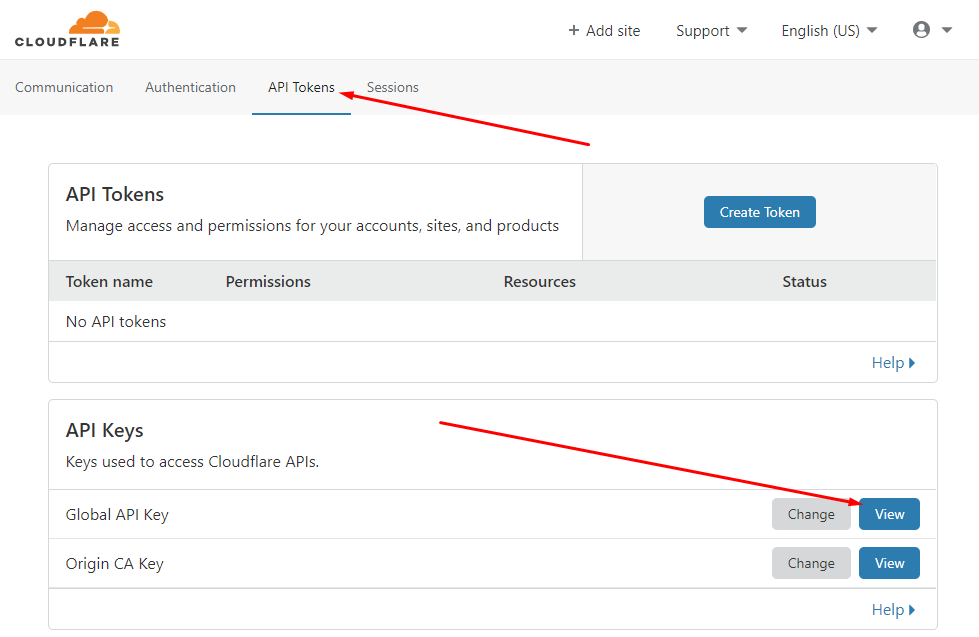
On the "Get your API token" page you will need to select the "API Tokens" link at the top, then select the "View" button for the "Global API Key".
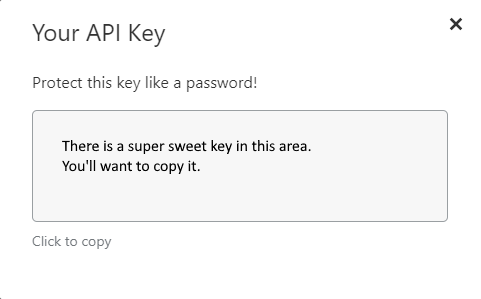
Put this key in the yourdomain.com.yml file.
Configuration is done. Now we just test and make sure we get no errors.
python /opt/cfddns/cloudflare-ddns.py -z yourdomain.com

# should see something along these lines...
2020-12-21 14:43:21,561 | INFO | The record 'www.yourdomain.com' (A) is already up to date
2020-12-21 14:43:21,561 | INFO | The record 'test.yourdomain.com' (A) is already up to date
2020-12-21 14:43:21,561 | INFO | The record 'stuff.yourdomain.com' (A) is already up to date
2020-12-21 14:43:21,562 | INFO | The record 'smoke.yourdomain.com' (A) is already up to date
2020-12-21 14:43:21,562 | INFO | The record 'mirror.yourdomain.com' (A) is already up to date
Test is good. Now set the cron job. Add the following to your crontab. This will check and update your DNS every 30 minutes.
vi /etc/crontab

# Every 30 minutes, update Cloudflare records.
*/30 * * * * python /opt/cfddns/cloudflare-ddns.py -z yourdomain.com
And that is it.
Happy DDNS'ing!!


