KVM, OVS, VLANs and bears!
Well, no bears, but... holy crap this took a minute to extrapolate! I am going to build out my entire network environment and put all of it in one place.
Update!
Well, just when I thought I had it all figured out. I get kicked in the junk and slapped in the face!
Apparently OVS is the flakiest half baked useful idea/app out there. It does exactly what I want, and lets me down when I need it most. To top it off, anyone posting anything about how to configure aspects of the application, only post the brain dead easy parts. Everyone else? Well they use Debian/Ubuntu and phat chance gleaming any knowledge from them, because they all post the same damn things too, and none of it applies to Red Hat or its variants.
Anyway, my old write up is broken. OVS will lose the configuration after a reboot. Maybe not the first or second reboot. But count on it leaving you high-n-dry.
It took extreme digging in the documentation to find just a sliver of hope. In addition, it took building the latest version from source (then I created my own RPMs from that). But! After playing mystery config for a little bit, I "think" I landed on a working configuration. Any searches in regards to my configuration... well the so called documentation was zero help. So I just had to throw some configurations at my setup, and see what stuck, or try and piece together the crappy ass error messages.
Honestly, I like this new method better as it makes things a bit more tangible, and less dependent on the crap OVS database functions.
Below I will give some detail to what I did to make this work and I will also post my "updated" configurations.
I hope it helps someone!
Real Quick Like...
In my previous write up, I detailed out the KVM and the server interface configurations. The KVM configs are still good, but I did need to modify the server interface configs (network-scripts). The interface configurations is what makes this whole thing work.
First things first, I uninstalled and removed all of OVS from my server.
# REMOVE OVS
systemctl stop openvswitch && systemctl disable openvswitch
systemctl stop ovs-vswitchd && systemctl disable ovs-vswitchd
systemctl stop ovsdb-server && systemctl disable ovsdb-server

dnf remove openvswitch* *openvswitch -y

rm -f /etc/sysconfig/openvswitch
rm -fR /etc/openvswitch*
rm -fR /var/run/openvswitch*
rm -fR /var/log/openvswitch*
Then I pulled down the the latest copy of the OVS source from Github. The version was 3.2.90 at the time.
https://github.com/openvswitch/ovs
# CLONE OVS SOURCE
cd /opt
git clone https://github.com/openvswitch/ovs.git
The OVS documentation explained how to check for dependencies and it "should" resolve them. However, I did some cleanup and manually loaded all the dev tools and dependencies. Being burned by OVS already, I have trust issues (you can call it spite or perhaps like I always say, "just learning from my mistakes").
Once that was done, I built the RPMs.
NOTE: If you want your RPM's to be compiled with DPDK, you will need to also go grab the DPDK version 22.x source and build that as well. Rocky 8.8 only has the 21.x packages available. I opted to not compile it in.
Open vSwitch with DPDK
# CLEANED UP OLD PACKAGES, DNF CACHE, AND INSTALL DEPS
dnf autoremove
dnf clean all
dnf makecache

# REMOVED OLD KERNELS
dnf remove --oldinstallonly --setopt installonly_limit=2 kernel -y

# REINSTALLED LATEST KERNEL AND MODULES
dnf reinstall kernel kernel-core kernel-modules -y

# INSTALLED DEV TOOLS AND BUILD PACKAGES
dnf install @'Development Tools' dnf-plugins-core rpm-build make automake -y

# INSTALLED DEPS
dnf install python3-six python3-sphinx libunwind-devel unbound-devel \
libpfm-devel python3-libpfm libcap-ng libcap-ng-devel libpcap-devel \
bpf* libbpf* libnuma* numa*

# REBOOTED
reboot
Let OVS check dependencies and then build the RPMs.
# OVS DEP CHECK AND RPM BUILD
cd /opt/ovs

./boot.sh
./configure --prefix=/usr --localstatedir=/var --sysconfdir=/etc

sed -e 's/@VERSION@/3.2.90/' rhel/openvswitch-fedora.spec.in > /tmp/ovs.spec
dnf builddep /tmp/ovs.spec
rm -f /tmp/ovs.spec

make rpm-fedora RPMBUILD_OPT="--with check"

ls -al rpm/rpmbuild/RPMS/x86_64/
Install OVS RPMs...
# INSTALL OVS
cd rpm/rpmbuild/RPMS/x86_64/

dnf install \
openvswitch-3.2.90-1.el8.x86_64.rpm \
network-scripts-openvswitch-3.2.90-1.el8.x86_64.rpm \
openvswitch-devel-3.2.90-1.el8.x86_64.rpm
This is all that is needed for OVS.
I no longer plug my bridge or interface or port commands into OVS (using the ovs-vsctl module). I now plug all the pertinent config options into the network-scripts themselves.
Not once have I needed to give OVS any commands besides ovs-vsctl show just to check things.
I give my complete interface script setup on the "configurations page". So right now I am just going to show you a config for a single physical port, tied to a bridge, with a vlan passed through a trunk. Really once you grasp this, the rest of your interfaces are pretty simple.
- A "physical" server port needs tied to a "bridge" configuration. So we change the physical ports config like so...
(paying attention to theTYPE,DEVICETYPE, andOVS_BRIDGEoptions)
# PHYSICAL PORT # /etc/sysconfig/network-scripts/ifcfg-eth3 DEVICE=eth3 NAME=eth3 HWADDR=xx:xx:xx:xx:xx:xx UUID=xxxxxxxx-xxxx-xxxx-xxxx-xxxxxxxxxxxx ONBOOT=yes BOOTPROTO=none TYPE=OVSPort DEVICETYPE=ovs OVS_BRIDGE=ovs3 HOTPLUG=no - The bridge (ovs3 in this example) would now need configured as if it was the physical port in a basic setup (my "configurations page" has the basic setup too). But in this example I am going to configure it with the actual vlan information.
(now paying attention to theTYPE,DEVICETYPE,OVS_PORTSandOVS_EXTRAoptions)
# BRIDGE INTERFACE # /etc/sysconfig/network-scripts/ifcfg-ovs3 DEVICE=ovs3 NAME=ovs3 ONBOOT=yes BOOTPROTO=none TYPE=OVSBridge DEVICETYPE=ovs OVS_PORTS="ext0" OVS_EXTRA="set port ovs3 trunk=310" HOTPLUG=no - Then we build the vlan interface. This interface would still be considered a "fake bridge", but because I am building out an actual interface script for it, OVS will not report it as a "fake bridge" in it's table (when you run the
ovs-vsctlcommand "ovs-vsctl list port ext0"). This interface script informs the system of the name and the vlan that it is a member of.
(now paying attention to theTYPE,DEVICETYPE,OVS_BRIDGE,OVS_OPTIONSandOVS_EXTRAoptions)
# VLAN BRIDGE INTERFACE
# /etc/sysconfig/network-scripts/ifcfg-ext0

DEVICE=ext0
NAME=ext0
ONBOOT=yes
BOOTPROTO=none
TYPE=OVSIntPort
DEVICETYPE=ovs
OVS_BRIDGE=ovs3
OVS_OPTIONS="tag=310"
OVS_EXTRA="set Interface $DEVICE external-ids:iface-id=$DEVICE"
HOTPLUG=no
That is it!
I can now restart my network or ifdown/up these scripts, and they will build the OVS configs. The major success I experienced with this method is, IT WILL NOT BE DELETED OR FORGOTTEN WHEN I REBOOT!!!
It took me a hot minute to cobble up this info and then another hotter minute to test out "OVS_?" options that have NO documentation. Wanna have some fun (guaranteed, anti fun)? Do a google search for "OVS_PORTS" and find anything, I mean anything what-so-ever that talks about OVS_PORTS. Then take it a step further, and correlate that search with anything that can be related to RHEL, CentOS, Rocky Linux, etc. etc. You will find absolutely SQUAT! SQUAT!!
The only information I was able to locate that related to RHEL based network script options at all was here (https://github.com/openvswitch/ovs/blob/master/rhel/README.RHEL.rst).
BONUS - You want some bonus anti fun? Go search the latest "official" OVS documentation for "ovs_port" (with or without the "s", with or without caps, use any variation of "OVS_"). OVS Official Documentation
What did you find???
Spoiler
SQUAT!!!
Alright, enough ranting.
Check out the configurations page for my "updated" scripts.
I hope this information helps someone!
Take care!
Configurations
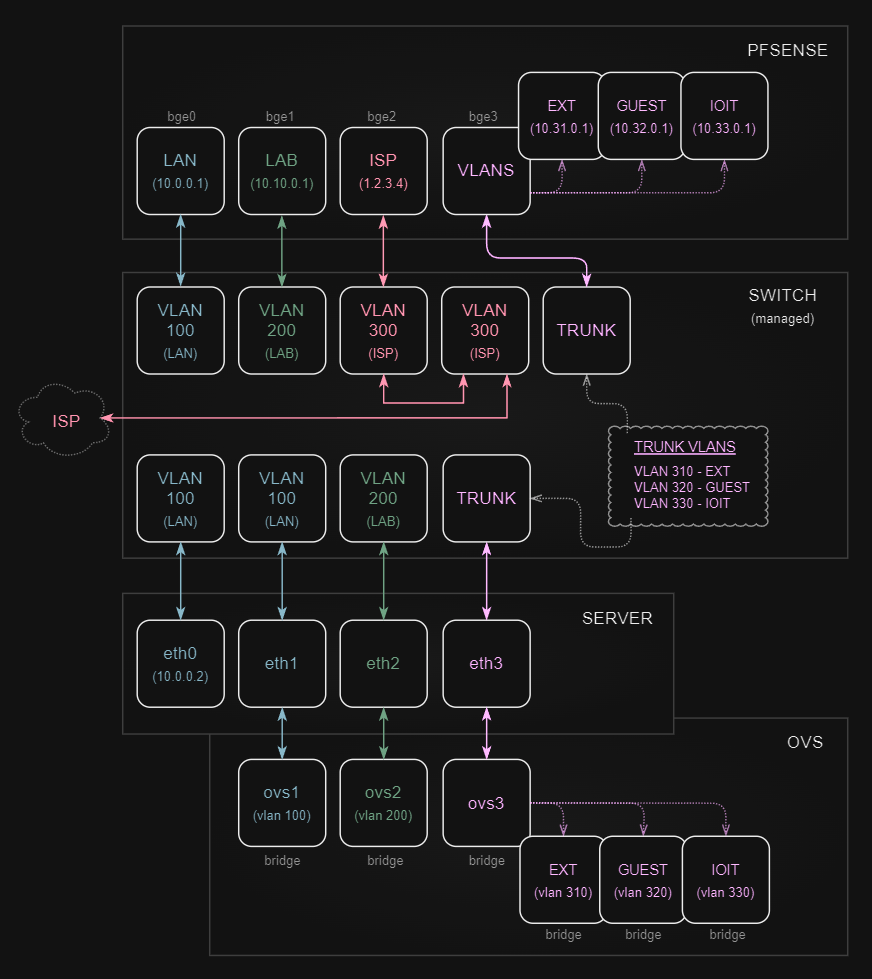
Below are my current configurations. I have broke them out of my original write up, so I could fix them with my "new" knowledge and just to make them handy.
Network Layout:
EDIT THE SCRIPTS FIRST AND/OR JUST TAKE THE PARTS YOU NEED!!
Scripted Configs:
rebuild-network-scripts.sh
#!/bin/bash

DS=$(date "+%Y%m%d"); # DATE STAMP

mkdir -p /root/backups
gtar -czf /root/backups/${DS}_network-scripts.tar.gz -C /etc/sysconfig/network-scripts/ .

cat > /etc/sysconfig/network-scripts/ifcfg-br0 << "EOF"
DEVICE=br0
NAME=br0
ONBOOT=yes
BOOTPROTO=none
TYPE=Bridge
DEFROUTE=yes
IPADDR=10.0.0.10
PREFIX=24
GATEWAY=10.0.0.1
DNS1=10.0.0.2
DOMAIN=skullscrape
PROXY_METHOD=none
BROWSER_ONLY=no
IPV4_FAILURE_FATAL=no
IPV6_DISABLED=yes
IPV6INIT=no
CONNECTION_METERED=no
NM_CONTROLLED=no
MTU=9000
STP=no

EOF

cat > /etc/sysconfig/network-scripts/ifcfg-eth0 << "EOF"
DEVICE=eno1
NAME=eno1
HWADDR=xx:xx:xx:xx:xx:xx
UUID=xxxxxxxx-xxxx-xxxx-xxxx-xxxxxxxxxxxx
ONBOOT=yes
BOOTPROTO=none
TYPE=Ethernet
MTU=9000
BRIDGE=br0

EOF

cat > /etc/sysconfig/network-scripts/ifcfg-eth1 << "EOF"
DEVICE=eth1
NAME=eth1
HWADDR=xx:xx:xx:xx:xx:xx
UUID=xxxxxxxx-xxxx-xxxx-xxxx-xxxxxxxxxxxx
ONBOOT=yes
BOOTPROTO=none
TYPE=OVSPort
DEVICETYPE=ovs
OVS_BRIDGE=ovs1
HOTPLUG=no
MTU=9000

EOF

cat > /etc/sysconfig/network-scripts/ifcfg-eth2 << "EOF"
DEVICE=eth2
NAME=eth2
HWADDR=xx:xx:xx:xx:xx:xx
UUID=xxxxxxxx-xxxx-xxxx-xxxx-xxxxxxxxxxxx
ONBOOT=yes
BOOTPROTO=none
TYPE=OVSPort
DEVICETYPE=ovs
OVS_BRIDGE=ovs2
HOTPLUG=no
MTU=9000

EOF

cat > /etc/sysconfig/network-scripts/ifcfg-eth3 << "EOF"
DEVICE=eth3
NAME=eth3
HWADDR=xx:xx:xx:xx:xx:xx
UUID=xxxxxxxx-xxxx-xxxx-xxxx-xxxxxxxxxxxx
ONBOOT=yes
BOOTPROTO=none
TYPE=OVSPort
DEVICETYPE=ovs
OVS_BRIDGE=ovs3
HOTPLUG=no
MTU=9000

EOF

cat > /etc/sysconfig/network-scripts/ifcfg-ovs1 << "EOF"
DEVICE=ovs1
NAME=ovs1
ONBOOT=yes
BOOTPROTO=none
TYPE=OVSBridge
DEVICETYPE=ovs
HOTPLUG=no

EOF

cat > /etc/sysconfig/network-scripts/ifcfg-ovs2 << "EOF"
DEVICE=ovs2
NAME=ovs2
ONBOOT=yes
BOOTPROTO=none
TYPE=OVSBridge
DEVICETYPE=ovs
HOTPLUG=no

EOF

cat > /etc/sysconfig/network-scripts/ifcfg-ovs3 << "EOF"
DEVICE=ovs3
NAME=ovs3
ONBOOT=yes
BOOTPROTO=none
TYPE=OVSBridge
DEVICETYPE=ovs
OVS_PORTS="ext0 guest0 ioit0"
OVS_EXTRA="set port ovs3 trunk=310,320,330"
HOTPLUG=no

EOF

cat > /etc/sysconfig/network-scripts/ifcfg-ext0 << "EOF"
DEVICE=ext0
NAME=ext0
ONBOOT=yes
BOOTPROTO=none
TYPE=OVSIntPort
DEVICETYPE=ovs
OVS_BRIDGE=ovs3
OVS_OPTIONS="tag=310"
OVS_EXTRA="set Interface $DEVICE external-ids:iface-id=$DEVICE"
HOTPLUG=no

EOF

cat > /etc/sysconfig/network-scripts/ifcfg-guest0 << "EOF"
DEVICE=guest0
NAME=guest0
ONBOOT=yes
BOOTPROTO=none
TYPE=OVSIntPort
DEVICETYPE=ovs
OVS_BRIDGE=ovs3
OVS_OPTIONS="tag=320"
OVS_EXTRA="set Interface $DEVICE external-ids:iface-id=$DEVICE"
HOTPLUG=no

EOF

cat > /etc/sysconfig/network-scripts/ifcfg-ioit0 << "EOF"
DEVICE=ioit0
NAME=ioit0
ONBOOT=yes
BOOTPROTO=none
TYPE=OVSIntPort
DEVICETYPE=ovs
OVS_BRIDGE=ovs3
OVS_OPTIONS="tag=330"
OVS_EXTRA="set Interface $DEVICE external-ids:iface-id=$DEVICE"
HOTPLUG=no

EOF

printf "\n\n RESTART NETWORK MANUALLY \n\n"

exit
rebuild-kvm.sh
#!/bin/bash

### REMOVE AND REBUILD KVM DEFINED NETWORK ###

virsh net-destroy ioit0
virsh net-destroy guest0
virsh net-destroy ext0
virsh net-destroy ovs3
virsh net-destroy ovs2
virsh net-destroy ovs1

virsh net-undefine ioit0
virsh net-undefine guest0
virsh net-undefine ext0
virsh net-undefine ovs3
virsh net-undefine ovs2
virsh net-undefine ovs1

cat > ./ovs1.xml << "EOF"
<network>
    <name>ovs1</name>
    <forward mode='bridge'/>
    <bridge name='ovs1'/>
    <virtualport type='openvswitch'/>
</network>
EOF

cat > ./ovs2.xml << "EOF"
<network>
    <name>ovs2</name>
    <forward mode='bridge'/>
    <bridge name='ovs2'/>
    <virtualport type='openvswitch'/>
</network>
EOF

cat > ./ovs3.xml << "EOF"
<network>
 <name>ovs3</name>
 <forward mode='bridge'/>
 <bridge name='ovs3'/>
 <virtualport type='openvswitch'/>
 <portgroup name='ext0'>
   <vlan>
     <tag id='310'/>
   </vlan>
 </portgroup>
 <portgroup name='guest0'>
   <vlan>
     <tag id='320'/>
   </vlan>
 </portgroup>
 <portgroup name='ioit0'>
   <vlan>
     <tag id='330'/>
   </vlan>
 </portgroup>
<portgroup name='TRUNK'>
   <vlan trunk='yes'>
     <tag id='310'/>
     <tag id='320'/>
     <tag id='330'/>
   </vlan>
 </portgroup>
</network>
EOF

cat > ./ext0.xml << "EOF"
<network>
  <name>ext0</name>
  <forward mode='bridge'/>
  <bridge name='ovs3'/>
  <virtualport type='openvswitch'/>
  <portgroup name='ext0'>
    <vlan>
      <tag id='310'/>
    </vlan>
  </portgroup>
</network>
EOF

cat > ./guest0.xml << "EOF"
<network>
  <name>guest0</name>
  <forward mode='bridge'/>
  <bridge name='ovs3'/>
  <virtualport type='openvswitch'/>
  <portgroup name='guest0'>
    <vlan>
      <tag id='320'/>
    </vlan>
  </portgroup>
</network>
EOF

cat > ./ioit0.xml << "EOF"
<network>
  <name>ioit0</name>
  <forward mode='bridge'/>
  <bridge name='ovs3'/>
  <virtualport type='openvswitch'/>
  <portgroup name='ioit0'>
    <vlan>
      <tag id='330'/>
    </vlan>
  </portgroup>
</network>
EOF

virsh net-define ovs1.xml
virsh net-define ovs2.xml
virsh net-define ovs3.xml
virsh net-define ext0.xml
virsh net-define guest0.xml
virsh net-define ioit0.xml

virsh net-autostart ovs1
virsh net-autostart ovs2
virsh net-autostart ovs3
virsh net-autostart ext0.xml
virsh net-autostart guest0.xml
virsh net-autostart ioit0.xml

virsh net-start ovs1
virsh net-start ovs2
virsh net-start ovs3
virsh net-start ext0.xml
virsh net-start guest0.xml
virsh net-start ioit0.xml

rm -f ovs1.xml
rm -f ovs2.xml
rm -f ovs3.xml
rm -f ext0.xml
rm -f guest0.xml
rm -f ioit0.xml

systemctl restart libvirtd
virsh net-list
exit
list-networks.sh
#!/bin/bash

CYN="\e[96m"
NON="\e[0m"

printf "${CYN}\n OVS NETWORK \n\n${NON}"
ovs-vsctl show
printf "${CYN}\n OVS BRIDGE LIST \n\n${NON}"
ovs-vsctl list-br
printf "${CYN}\n VIRSH DOMAIN LIST \n\n${NON}"
virsh list --all
printf "${CYN}\n VIRSH NETWORK LIST \n\n${NON}"
virsh net-list --all
printf "${CYN}\n VIRSH INTERFACE LIST \n\n${NON}"
virsh iface-list --all

exit
Cisco Config:
Cisco Config
### NOT A SCRIPT - JUST THE PERTINENT PARTS OF MY CONFIG ###

vrf definition LAN
 description LAN NETWORK
 address-family ipv4
 exit-address-family
!
vrf definition LAB
 description LAB NETWORK
 address-family ipv4
 exit-address-family
!
vrf definition ISP
 description ISP NETWORK
 address-family ipv4
 exit-address-family
!
vrf definition EXT
 description EXTERNAL NETWORK
 address-family ipv4
 exit-address-family
!
vrf definition GUEST
 description GUEST NETWORK
 address-family ipv4
 exit-address-family
!
vrf definition IOIT
 description INSECURE NETWORK
 address-family ipv4
 exit-address-family
!


vlan 100
 name LAN
!
vlan 200
 name LAB
!
vlan 300
 name ISP
!
vlan 310
 name EXT
!
vlan 320
 name GUEST
!
vlan 330
 name IOIT
!


interface GigabitEthernet1/0/1
 description PFSENSE : BGE0 : LAN (10.0.0.1)
 switchport access vlan 100
 switchport mode access
!
interface GigabitEthernet1/0/2
 description PFSENSE : BGE1 : LAB (10.10.0.1)
 switchport access vlan 200
 switchport mode access
!
interface GigabitEthernet1/0/3
 description PFSENSE : BGE2 : WAN (1.2.3.4)
 switchport access vlan 300
 switchport mode access
!
interface GigabitEthernet1/0/4
 description PFSENSE : BGE3 : TRUNK (VLANS)
 switchport trunk allowed vlan 310,320,330
 switchport mode trunk
!
interface GigabitEthernet1/0/5
 description VHOST : ETH0 : MGMT
 switchport access vlan 100
 switchport mode access
!
interface GigabitEthernet1/0/6
 description VHOST : ETH1 : LAN (OVS1)
 switchport access vlan 100
 switchport mode access
!
interface GigabitEthernet1/0/7
 description VHOST : ETH2 : LAB (OVS2)
 switchport access vlan 200
 switchport mode access
!
interface GigabitEthernet1/0/8
 description VHOST : ETH3 : TRUNK (OVS3)
 switchport trunk allowed vlan 310,320,330
 switchport mode trunk
!
interface GigabitEthernet1/0/9
 description ISP IN
 switchport access vlan 300
 switchport mode access
!


interface Vlan100
 description LAN
 vrf forwarding LAN
 ip address 10.0.0.254 255.255.255.0
!
interface Vlan200
 description LAB
 vrf forwarding LAB
 ip address 10.10.0.254 255.255.255.0
!
interface Vlan300
 description ISP
 vrf forwarding ISP
 no ip address
!
interface Vlan310
 description EXT
 vrf forwarding EXT
 ip address 10.31.0.254 255.255.255.0
!
interface Vlan320
 description GUEST
 vrf forwarding GUEST
 ip address 10.32.0.254 255.255.255.0
!
interface Vlan330
 description IOIT
 vrf forwarding IOIT
 ip address 10.33.0.254 255.255.255.0
!


ip route vrf LAN 0.0.0.0 0.0.0.0 10.0.0.1
ip route vrf LAB 0.0.0.0 0.0.0.0 10.10.0.1
ip route vrf EXT 0.0.0.0 0.0.0.0 10.31.0.1
ip route vrf GUEST 0.0.0.0 0.0.0.0 10.32.0.1
ip route vrf IOIT 0.0.0.0 0.0.0.0 10.33.0.1
!
Installs and Stuff
Application installs for Rocky Linux 8.8 (and most likely variants). Also some reference material.
Install: Open vSwitch (OVS)
Here are the steps to get Open vSwitch loaded up from source (don't let that scare you, we are still going to use RPMs).
There are other directions out there. Now, this will be one of them.
NOTE: I have included some cleanup actions and some manual dependency installs. Just use what you need if not all of it.
# REMOVE OVS IF INSTALL WITH DISTRO PACKAGES
systemctl stop openvswitch && systemctl disable openvswitch
systemctl stop ovs-vswitchd && systemctl disable ovs-vswitchd
systemctl stop ovsdb-server && systemctl disable ovsdb-server

dnf remove openvswitch* *openvswitch -y

rm -f /etc/sysconfig/openvswitch
rm -fR /etc/openvswitch*
rm -fR /var/run/openvswitch*
rm -fR /var/log/openvswitch*
# CLONE OVS SOURCE FROM GITHUB
cd /opt
git clone https://github.com/openvswitch/ovs.git
# ENABLE IPROUTING
cat > /etc/sysctl.d/iprouting.conf << "EOF"
net.ipv4.ip_forward=1
net.ipv4.conf.all.rp_filter = 2
EOF# CLEANED UP OLD PACKAGES, DNF CACHE, AND INSTALL DEPS
dnf autoremove
dnf clean all
dnf makecache
# REMOVED OLD KERNELS
dnf remove --oldinstallonly --setopt installonly_limit=2 kernel -y
# REINSTALLED LATEST KERNEL AND MODULES
dnf reinstall kernel kernel-core kernel-modules -y
# INSTALLED DEV TOOLS AND BUILD PACKAGES
dnf install @'Development Tools' dnf-plugins-core rpm-build make automake -y
# INSTALLED DEPS
dnf install python3-six python3-sphinx libunwind-devel unbound-devel \
libpfm-devel python3-libpfm libcap-ng libcap-ng-devel libpcap-devel \
bpf* libbpf* libnuma* numa*# REBOOTED
reboot
NOTE: If you want your RPM's to be compiled with DPDK, you will need to also go grab the DPDK version 22.x source and build that as well. Rocky 8.8 only has the 21.x packages available. I opted to not compile it in.
Open vSwitch with DPDK
# OVS CONFIGURE, DEP CHECK AND RPM BUILD
cd /opt/ovs

./boot.sh
./configure --prefix=/usr --localstatedir=/var --sysconfdir=/etc

sed -e 's/@VERSION@/3.2.90/' rhel/openvswitch-fedora.spec.in > /tmp/ovs.spec
dnf builddep /tmp/ovs.spec
rm -f /tmp/ovs.spec

make rpm-fedora RPMBUILD_OPT="--with check"

ls -al rpm/rpmbuild/RPMS/x86_64/
# INSTALL OVS
cd rpm/rpmbuild/RPMS/x86_64/
dnf install \
openvswitch-3.2.90-1.el8.x86_64.rpm \
network-scripts-openvswitch-3.2.90-1.el8.x86_64.rpm \
openvswitch-devel-3.2.90-1.el8.x86_64.rpmInstall: KVM / QEMU
Here are the steps to get KVM/QEMU installed.
First check and make sure that virtualization is enabled in the bios and seen by the system
lscpu | grep VirtualizationShould look something like this

Can also use this command and look for 'vmx' or 'svm' in the output.
cat /proc/cpuinfo | egrep "vmx|svm"Should look something like this

Once that is validated, load up some KVM
# LOAD THE EPEL REPO AND INSTALL THE KVM APPLICATION AND TOOLS
dnf install -y epel-release
dnf install -y libvirt virt-install libvirt-client libguestfs-tools libosinfo virt-top

systemctl enable libvirtd
systemctl start libvirtd
Insure the KVM modules got loaded
lsmod | grep kvmShould look something like this

Optional:
If you are running a desktop environment, you could install "virt-manager" and manage the KVM with a GUI.
dnf install virt-managerReference: KVM Networks
Virtual Machine Network Configuration (Install)
When creating a virtual machine on the CLI or if like me you create small script files and use virt-install,
virt-install \
--name sweetname \
--description "Awesome Rocky Server" \
--ram 16384 \
--disk path=/vsto/machines/sweetname.img,size=120 \
--cpu host \
--vcpus=4 \
--cpuset=auto \
--os-variant=rocky8.6 \
--accelerate \
--network bridge:br0 \
--graphics vnc,listen=0.0.0.0 \
--video virtio \
--cdrom /sto/vm/images/rocky-minimal.iso
The network line "--network bridge:br0" should be modified to use the new OVS bridge networks. From my testing if your configuring for a OVS bridge network that was setup on a access port (untagged port), then it does not appear to matter if you identify the type as either bridge or network. For example,
# BRIDGE
--network bridge:ovs1

# NETWORK
--network network:ovs1
The resulting XML that is created for the virtual machine (or 'domain' as they call it), does reflect your choice. So your 'interface' section of the XML could look like these examples,
# BRIDGE
    <interface type='bridge'>
      <source bridge='ovs1'/>
    </interface>

# NETWORK
    <interface type='network'>
      <source network='ovs1'/>
    </interface>
Either method appears to work.
However, when using a OVS bridge network that was setup on a trunk port (tagged port). We do need to use the network type, because we also need to identify the portgroup of the VLANs that were defined. In this case we would configure like so,
# NETWORK WITH VLAN
--network network:ovs3,portgroup=ext0
The XML for this configuration would look like this,
# NETWORK WITH VLAN
    <interface type='network'>
      <source network='ovs3' portgroup='ext0'/>
    </interface>
This configuration will put your machine on the specified VLAN.
However again, you can also define the VLAN networks within KVM, so you can just call the VLAN name. The configurations page shows both options being used.
Another option that can be added to the network configure line (there is actually a lot that can be configured, but for the sake of this write up, I am sticking to options that pertain to OVS and will make things work) is virtualport_type=openvswitch.
This option specifically tells the KVM system that this port is part of the OVS network. I am not sure of all the implications for using this option or not using it. However, I do like the idea of telling the configuration that it should use the OVS networks, and not something that could be configured elsewhere. This adds the following to the XML,
# ACCESS PORT (UNTAGGED) NETWORK
<interface type='network'>
      <source network='ovs1'/>
      <virtualport type='openvswitch'>
        <parameters interfaceid='xxxxxxxx-xxxx-xxxx-xxxx-xxxxxxxxxxxx'/>
      </virtualport>
    </interface>

# TRUNK (TAGGED) NETWORK WITH VLAN (PORTGROUP)
    <interface type='network'>
      <source network='ovs3' portgroup='ext0'/>
      <virtualport type='openvswitch'>
        <parameters interfaceid='xxxxxxxx-xxxx-xxxx-xxxx-xxxxxxxxxxxx'/>
      </virtualport>
    </interface>
For me, I prefer to use the network type for all my configurations and I also tag on the virtualport_type. This just allows for consistency (at least until I deep dive and fully understand all options and their purposes).
To sum up the install configuration for OVS networks, the following options work,
# ACCESS PORT (UNTAGGED) NETWORK
--network network:ovs1,virtualport_type=openvswitch

# TRUNK (TAGGED) NETWORK WITH VLAN (PORTGROUP)
--network network:ovs3,portgroup=ext0,virtualport_type=openvswitch
Virtual Machine Network Configuration (Post Install)
Above I have already shown examples of the XML that is created when creating a virtual machine. Here I will show how to modify those setting after a virtual machine is created or for existing machines that will be added to a OVS network.
BACKUP WARNING!
Create a backup of your virtual machines XML file before making any changes. Just in case something goes sideways.virsh dumpxml vm-name > vm-name.xml
TIME SAVER TIP!
Before shutting down your VM and changing your network settings within the XML. Change the IP information on your VM first so after saving your changes and starting your machine, it will come up on the new network.
First off you will want the virtual machine turned off. The XML of virtual machines are live and get edits when the machines are turned on. So to make a configuration stick (persistent), you will want to shut the machine down.
# GRACEFUL SHUTDOWN
virsh shutdown <vm name>

# FORCE SHUTDOWN
virsh destroy <vm name>
After the machine is shutdown we can edit the machines XML with the following,
virsh edit <vm name>The editor will use what is set as your systems default editor, or will default to using the VI editor.
Comb down through the XML config until you locate the <interface> element.
If the machine used a bridge that was setup prior to having OVS, the configuration may look like the following,
    <interface type='bridge'>
      <mac address='xx:xx:xx:xx:xx:xx'/>
      <source bridge='br0'/>
      <model type='virtio'/>
      <address type='pci' domain='0x0000' bus='0x01' slot='0x00' function='0x0'/>
    </interface>
We will want to modify the interface type within the element, the source, and also add the virtualport type. Like so,
    <interface type='network'>
      <mac address='xx:xx:xx:xx:xx:xx'/>
      <source network='ovs1'/>
      <virtualport type='openvswitch'/>
      <model type='virtio'/>
      <address type='pci' domain='0x0000' bus='0x01' slot='0x00' function='0x0'/>
    </interface>
This config example is using the "ovs1" network from The Crux write up. This network is connected to a access port (untagged), on my switch. So it does not require adding a portgroup (vlan) to the configuration.
Changing the network to a trunk port (tagged) and specifying the vlan (portgroup), is done the same way. We just need to add the portgroup to the source element. This example will use the "ovs3" network from The Crux write up, and the "ext0" vlan.
    <interface type='network'>
      <mac address='xx:xx:xx:xx:xx:xx'/>
      <source network='ovs3' portgroup='ext0'/>
      <virtualport type='openvswitch'/>
      <model type='virtio'/>
      <address type='pci' domain='0x0000' bus='0x01' slot='0x00' function='0x0'/>
    </interface>
Once that is complete, save the XML and turn your machine back on,
virsh start <vm name>That's it!
Hope this helps, and perhaps adds a little knowledge to your arsenal. :)
The Crux Write Up (archived in rage)
Archiving my original write up. It works... just don't count on it being there for you.
It appears OVS breaks itself on purpose. So maddening!!
Intro
So I have scoured the web and FINALLY was able to extract all the pieces, in order to properly configure my network components. I have been running my crap for a long time with a configuration that worked, but was scared to really change it. I didn't know the real in's and out's of what I had did and it took me a long time. I didn't want to waste another forever trying to fix it if I broke it.
That was a few years ago. Well, recently, I needed more from my network, and I also wanted to KNOW how to do it, and how to fix it if I broke it. I spent a good week searching the web and forums and github and manufacturers web sites and etc... etc... etc. Once I finally found the parts I was looking for and put it all together, I can finally say, "HOLY CRAP! This is easy!!"
I would also like to say that if you do not have all the parts and pieces or the understanding of how they work together...
IT IS NOT EASY! Finding all those pieces, IS NOT EASY! The #1 problem out there is that there are so many people that do understand it, and have all the pieces, so it is "easy" for them. And when the noob comes knocking and asking questions, they only get answers to the question, not an explanation of how it all fits. A lot of the write ups and conversations assume you know the rest. The #2 problem is that the noobs asking questions, do not have all the information to even know what they should ask.
I have been fortunate in my ability to put pieces together, and when trying to do anything I always try and keep it as simple as possible. Once I understand what I am doing or did, then I expand on what I know, or start looking to improve on what I know.
Below I am going to show all the commands and configs that I used to setup my home network, my lab, external networks, everything! That perhaps may sound like a mouth full or daunting, but I can insure you it is not. You will call it "easy" too when I am done.
The Crux
Physical Components
To start with let me give some detail about my setup. In addition you should know that it does not matter one little bit about my setup. You will be able to use the commands and tweak configs to match whatever you are trying to accomplish. To repeat what I said in my intro page, once you have ALL the parts you will be able to do whatever you want, with ease.
Also keep in mind, it's going to take longer to read this page then it will be actually doing the work. Because of that, I am going to post a few scripts that I put together before I start digging in. I am able to blow my entire virtual host network away and just run these scripts, and I am back up and running in under 30 seconds. The scripts have all of the OVS commands, the host network configs, and the KVM virsh commands and xml configs to define the networks.
Perhaps, you just want to work the server side? Configure networks, configure OVS, and setup KVM?
Jump to The Crux of it.
DO NOT JUST COPY PASTE THESE SCRIPTS AND RUN THEM!!
You need to change them to fit your design, and include your specific interface names. There are also additional parts within these scripts that will try and delete ALL OVA configurations, and ALL KVM networks. You may not want that to happen.
EDIT THE SCRIPTS FIRST OR JUST TAKE WHAT YOU NEED!!
Here is my network layout:
Network Layout
Here are the scripts:
rebuild-configs.sh
#!/bin/bash

DS=$(date "+%Y%m%d"); # DATE STAMP

mkdir -p /root/backups
gtar -czf /root/backups/${DS}_network-scripts.tar.gz -C /etc/sysconfig/network-scripts/ .

cat > /etc/sysconfig/network-scripts/ifcfg-eth0 << "EOF"
DEVICE=eth0
NAME=eth0
HWADDR=xx:xx:xx:xx:xx:xx
UUID=xxxxxxxx-xxxx-xxxx-xxxx-xxxxxxxxxxxx
ONBOOT=yes
BOOTPROTO=none
TYPE=Ethernet
DEFROUTE=yes
MTU=9000
IPADDR=10.0.0.2
PREFIX=24
GATEWAY=10.0.0.1
DNS1=10.0.0.3
DOMAIN=internal
PROXY_METHOD=none
BROWSER_ONLY=no
IPV4_FAILURE_FATAL=no
IPV6_DISABLED=yes
IPV6INIT=no
CONNECTION_METERED=no
NM_CONTROLLED=no
STP=no

EOF

cat > /etc/sysconfig/network-scripts/ifcfg-eth1 << "EOF"
DEVICE=eth1
NAME=eth1
HWADDR=xx:xx:xx:xx:xx:xx
UUID=xxxxxxxx-xxxx-xxxx-xxxx-xxxxxxxxxxxx
ONBOOT=yes
BOOTPROTO=none
TYPE=Ethernet
HOTPLUG=no
MTU=9000

EOF

cat > /etc/sysconfig/network-scripts/ifcfg-eth2 << "EOF"
DEVICE=eth2
NAME=eth2
HWADDR=xx:xx:xx:xx:xx:xx
UUID=xxxxxxxx-xxxx-xxxx-xxxx-xxxxxxxxxxxx
ONBOOT=yes
BOOTPROTO=none
TYPE=Ethernet
HOTPLUG=no
MTU=9000

EOF

cat > /etc/sysconfig/network-scripts/ifcfg-eth3 << "EOF"
DEVICE=eth3
NAME=eth3
HWADDR=xx:xx:xx:xx:xx:xx
UUID=xxxxxxxx-xxxx-xxxx-xxxx-xxxxxxxxxxxx
ONBOOT=yes
BOOTPROTO=none
TYPE=Ethernet
HOTPLUG=no
MTU=9000

EOF

cat > /etc/sysconfig/network-scripts/ifcfg-ovs1 << "EOF"
DEVICE=ovs1
NAME=ovs1
ONBOOT=yes
BOOTPROTO=none
TYPE=OVSBridge
DEVICETYPE=ovs
HOTPLUG=no
MTU=9000

EOF

cat > /etc/sysconfig/network-scripts/ifcfg-ovs2 << "EOF"
DEVICE=ovs2
NAME=ovs2
ONBOOT=yes
BOOTPROTO=none
TYPE=OVSBridge
DEVICETYPE=ovs
HOTPLUG=no
MTU=9000

EOF

cat > /etc/sysconfig/network-scripts/ifcfg-ovs3 << "EOF"
DEVICE=ovs3
NAME=ovs3
ONBOOT=yes
BOOTPROTO=none
TYPE=OVSBridge
DEVICETYPE=ovs
HOTPLUG=no
MTU=9000

EOF

cat > /etc/sysconfig/network-scripts/ifcfg-ext0 << "EOF"
DEVICE=ext0
NAME=ext0
ONBOOT=yes
BOOTPROTO=none
TYPE=OVSBridge
DEVICETYPE=ovs
HOTPLUG=no
MTU=9000

EOF

cat > /etc/sysconfig/network-scripts/ifcfg-guest0 << "EOF"
DEVICE=guest0
NAME=guest0
ONBOOT=yes
BOOTPROTO=none
TYPE=OVSBridge
DEVICETYPE=ovs
HOTPLUG=no
MTU=9000

EOF

cat > /etc/sysconfig/network-scripts/ifcfg-ioit0 << "EOF"
DEVICE=ioit0
NAME=ioit0
ONBOOT=yes
BOOTPROTO=none
TYPE=OVSBridge
DEVICETYPE=ovs
HOTPLUG=no
MTU=9000

EOF

printf "\n\n RESTART NETWORK MANUALLY \n\n"

exit
rebuild-ovs.sh
#!/bin/bash

### REMOVE AND REBUILD ALL OVS NETWORKS ###

ovs-vsctl del-br ioit0
ovs-vsctl del-br guest0
ovs-vsctl del-br ext0
ovs-vsctl del-br ovs3
ovs-vsctl del-br ovs2
ovs-vsctl del-br ovs1

ovs-vsctl emer-reset

systemctl stop openvswitch
systemctl stop ovs-vswitchd
systemctl stop ovsdb-server

rm -f /etc/openvswitch/conf.db
rm -f /etc/openvswitch/.conf.db.~lock~
rm -f /var/run/openvswitch/*
rm -f /var/log/openvswitch/*

systemctl start ovsdb-server
systemctl start ovs-vswitchd
systemctl start openvswitch

ovs-vsctl init
sleep 3

ovs-vsctl add-br ovs1
ovs-vsctl add-port ovs1 eth1
sleep 1

ovs-vsctl add-br ovs2
ovs-vsctl add-port ovs2 eth2
sleep 1

ovs-vsctl add-br ovs3
ovs-vsctl add-port ovs3 eth3
ovs-vsctl set port ovs3 trunk=310,320,330
ovs-vsctl add-br ext0 ovs3 310
ovs-vsctl add-br guest0 ovs3 320
ovs-vsctl add-br ioit0 ovs3 330
sleep 1

ovs-vsctl show

exit
rebuild-kvm.sh
#!/bin/bash

### REMOVE AND REBUILD KVM DEFINED NETWORK ###

virsh net-destroy ovs3
sleep 1
virsh net-destroy ovs2
sleep 1
virsh net-destroy ovs1
sleep 1

virsh net-undefine ovs3
sleep 1
virsh net-undefine ovs2
sleep 1
virsh net-undefine ovs1
sleep 1

cat > ./ovs1.xml << "EOF"
<network>
    <name>ovs1</name>
    <forward mode='bridge'/>
    <bridge name='ovs1'/>
    <virtualport type='openvswitch'/>
</network>

EOF

cat > ./ovs2.xml << "EOF"
<network>
    <name>ovs2</name>
    <forward mode='bridge'/>
    <bridge name='ovs2'/>
    <virtualport type='openvswitch'/>
</network>

EOF

cat > ./ovs3.xml << "EOF"
<network>
 <name>ovs3</name>
 <forward mode='bridge'/>
 <bridge name='ovs3'/>
 <virtualport type='openvswitch'/>
 <portgroup name='ext0'>
   <vlan>
     <tag id='310'/>
   </vlan>
 </portgroup>
 <portgroup name='guest0'>
   <vlan>
     <tag id='320'/>
   </vlan>
 </portgroup>
 <portgroup name='ioit0'>
   <vlan>
     <tag id='330'/>
   </vlan>
 </portgroup>
<portgroup name='TRUNK'>
   <vlan trunk='yes'>
     <tag id='310'/>
     <tag id='320'/>
     <tag id='330'/>
   </vlan>
 </portgroup>
</network>

EOF

virsh net-define ovs1.xml
sleep 1
virsh net-define ovs2.xml
sleep 1
virsh net-define ovs3.xml
sleep 1

virsh net-autostart ovs1
sleep 1
virsh net-autostart ovs2
sleep 1
virsh net-autostart ovs3
sleep 1

virsh net-start ovs1
sleep 1
virsh net-start ovs2
sleep 1
virsh net-start ovs3
sleep 1

rm -f ovs1.xml
rm -f ovs2.xml
rm -f ovs3.xml

systemctl restart libvirtd

virsh net-list

exit
list-networks.sh
#!/bin/bash

printf "\n\n ----------> HOST NETWORK INTERFACES <---------- \n\n"
ifconfig


printf "\n\n ----------> OVS NETWORKS <---------- \n\n"
ovs-vsctl show


printf "\n\n ----------> KVM DEFINED NETWORKS <---------- \n\n"
virsh net-list

exit
Here is my cisco config:
Cisco Config
### NOT A SCRIPT - JUST THE PERTINENT PARTS OF MY CONFIG ###

vrf definition LAN
 description LAN NETWORK
 !
 address-family ipv4
 exit-address-family
!
vrf definition LAB
 description LAB NETWORK
 !
 address-family ipv4
 exit-address-family
!
vrf definition ISP
 description ISP NETWORK
 !
 address-family ipv4
 exit-address-family
!
vrf definition EXT
 description EXTERNAL NETWORK
 !
 address-family ipv4
 exit-address-family
!
vrf definition GUEST
 description GUEST NETWORK
 !
 address-family ipv4
 exit-address-family
!
vrf definition IOIT
 description INSECURE NETWORK
 !
 address-family ipv4
 exit-address-family
!
!

vlan 100
 name LAN
!
vlan 200
 name LAB
!
vlan 300
 name ISP
!
vlan 310
 name EXT
!
vlan 320
 name GUEST
!
vlan 330
 name IOIT
!
!

interface GigabitEthernet1/0/1
 description PFSENSE : BGE0 : LAN (10.0.0.1)
 switchport access vlan 100
 switchport mode access
!
interface GigabitEthernet1/0/2
 description PFSENSE : BGE1 : LAB (10.10.0.1)
 switchport access vlan 200
 switchport mode access
!
interface GigabitEthernet1/0/3
 description PFSENSE : BGE2 : WAN (1.2.3.4)
 switchport access vlan 300
 switchport mode access
!
interface GigabitEthernet1/0/4
 description PFSENSE : BGE4 : TRUNK (VLANS)
 switchport trunk allowed vlan 310,320,330
 switchport mode trunk
!
interface GigabitEthernet1/0/5
 description VHOST : ETH0 : MGMT (10.0.0.2)
 switchport access vlan 100
 switchport mode access
!
interface GigabitEthernet1/0/6
 description VHOST : ETH1 : LAN (OVS1)
 switchport access vlan 100
 switchport mode access
!
interface GigabitEthernet1/0/7
 description VHOST : ETH2 : LAB (OVS2)
 switchport access vlan 200
 switchport mode access
!
interface GigabitEthernet1/0/8
 description VHOST : ETH3 : TRUNK (OVS3)
 switchport trunk allowed vlan 310,320,330
 switchport mode trunk
!
interface GigabitEthernet1/0/9
 description ISP IN
 switchport access vlan 300
 switchport mode access
!
interface GigabitEthernet1/0/10
 description MY MOCHEEN
 switchport access vlan 100
 switchport mode access
!
!

interface Vlan100
 description LAN
 vrf forwarding LAN
 ip address 10.0.0.254 255.255.255.0
!
interface Vlan200
 description LAB
 vrf forwarding LAB
 ip address 10.10.0.254 255.255.255.0
!
interface Vlan300
 description ISP
 vrf forwarding ISP
 no ip address
!
interface Vlan310
 description EXT
 vrf forwarding EXT
 ip address 10.31.0.254 255.255.255.0
!
interface Vlan320
 description GUEST
 vrf forwarding GUEST
 ip address 10.32.0.254 255.255.255.0
!
interface Vlan330
 description IOIT
 vrf forwarding IOIT
 ip address 10.33.0.254 255.255.255.0
!
!

ip route vrf LAN 0.0.0.0 0.0.0.0 10.0.0.1
ip route vrf LAB 0.0.0.0 0.0.0.0 10.10.0.1
ip route vrf EXT 0.0.0.0 0.0.0.0 10.31.0.1
ip route vrf GUEST 0.0.0.0 0.0.0.0 10.32.0.1
ip route vrf IOIT 0.0.0.0 0.0.0.0 10.33.0.1
!
!
HEY!! You DO NOT need a Cisco switch to understand and implement anything in this write up. To be brutally honest you don't need a switch at all, nor do you need a separate firewall. You could build out everything on just the server. To take it even a bit further, your server could have only one physical network interface and you could still make it work.
The main take away from this write up is, all the commands needed for OpenVSwitch, all the commands and xml configs needed for KVM, and the dead simple network configurations for the vhost server. That's it! Once you have those parts you should be good to go. AND... all of that is in the scripts above. Your welcome.
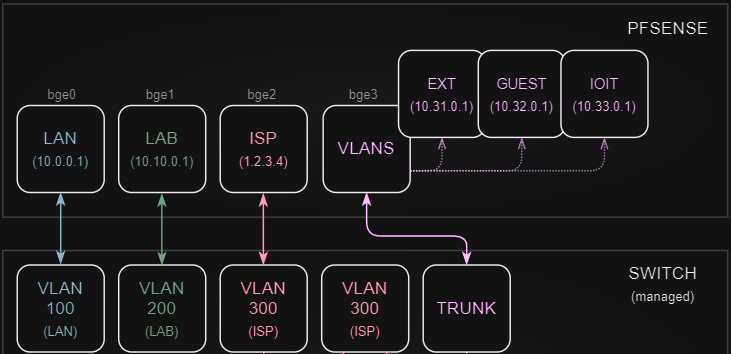
Alright. So, working with my network layout (above). I am going to try and simplify that in words. :) I will push all the pfSense firewall configurations to a new page. It's good stuff, but has no bearing on setting up bridges and working with vlans from a virtual hosting standpoint.
I started with a piece of paper (yep, a tangible blank piece of paper) and my super duper Pentel P209 0.9mm mechanical pencil. I started drawing and notating what I wanted and the main points for me were,
- I need my physical internal network that my family uses, to not be effected by my shenanigan's
- I want a LAB network that doesn't effect my LAN but that I can work in with ease
- I want a GUEST network that does not touch any of my networks
- I want a IOIT network that also can not touch any other networks
(IOIT: Internet of Insecure Things - Thank you Tom Lawrence) - I want a EXTernal network that can host production servers on the internet, and has ZERO access to anything else
- I want the ability to configure a access port on my switch and place a physical machine on any of my networks
- I want that same ability for virtual machines that I build
Is that too much to ask? It was at first :)
On my switch I created all the vlans I wanted and noodled over what those numbers were gunna be,
- VLAN 100 - LAN
- VLAN 200 - LAB
- VLAN 300 - ISP (gunna talk about this in a minute)
- VLAN 310 - EXT
- VLAN 320 - GUEST
- VLAN 330 - IOIT
Initially I did not have a static external IP. I was handed a DHCP address from my ISP. So part of my design in the beginning had the GUEST network as part of the ISP vlan. This way, anyone coming over and getting on my wireless would get a DHCP address from the ISP, and I wouldn't need to buildout a NAT for that subnet or manage the DHCP server and scope. It's not difficult, but it was one less piece I had to worry about. Then my ISP swapped out my gear and upgraded my account, and that was pretty much the same time I moved to a static address. I left the configuration in place where it goes to my switch first, then to the firewall, but it totally does not need to be like that. The ISP link should go directly to the firewall. BUT... hopefully the idea helps someone else.
Because VLAN 300 is a external link, I also created my EXT, GUEST, and IOIT networks within the same 300 block, just to keep it visually straight when I see them. I also use the first couple digits of the vlan numbers in the subnets for each one to also help keep it straight,
Something else I did on the switch was put all my vlan networks in a VRF (virtual routing and forwarding). Doing this isolated each network as if they were each on their own switch (well it allowed for multiple routing tables on the same switch). This is not a requirement, and I totally could have just used ACLs to accomplish the same thing. Depending on your switch or the design you go with, I recommend doing what you can to separate your networks at the switch, just so it's one last thing to worry about. By doing this on my switch, I put all the policy control of my networks in the hands of my firewall (pfSense).
A quick blurb about the pfSense firewall. I set all the gateways for each network on the pfSense firewall. I am able to control all the in and out rules for each network, and can allow networks to interact with each other should I so choose. In addition, the LAN, LAB, GUEST, and IOIT networks all have their own DHCP servers as well. Like I mentioned previously, I will create a page that details out the pfSense configuration. But for now all that really needs said is that, my gateways are all on the pfSense, my LAN, LAB, and ISP have dedicated network interfaces, and the 4th interface on my firewall is setup to handle any VLANs I add to the TRUNK on my switch.
Ok. Now that the switch has been detailed with vlans. I assigned those vlans to ports. A set of access ports for LAN, LAB, and ISP go direct to firewall interfaces, and a trunk port was created that allows EXT, GUEST, and IOIT to be passed to the 4th port.
Another set of access ports are created for LAN and LAB. I created two access ports for LAN, and one of those is solely for the management of the server. By configuring this one network just for management (just a normal interface configuration), I am able to work with all the other interfaces and virtual configs without losing access to the server, should I just blow them all way.
The second LAN and the LAB access ports consume the next two interfaces on the server, and another trunk is created on the switch for EXT, GUEST, and IOIT then connected to the fourth interface on the server.
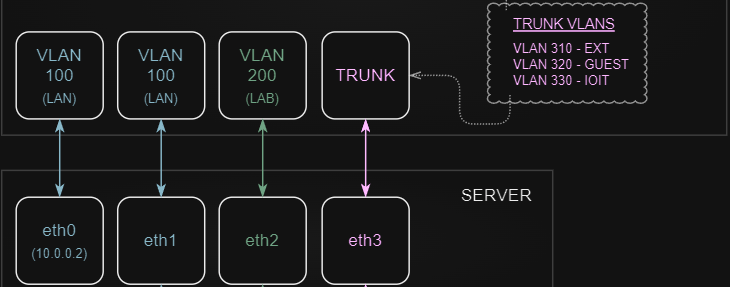
NOTE: I had the ports available on the firewall and the server and just chose to use them in this way. I could have accomplished the same thing if I would have just created two TRUNKs, one for the firewall and one for the server, and just passed the VLANs for each over that single link. In some regards, maybe that would be cleaner.
It was not the avenue I took, but just know that using a single TRUNK for each would be configured the same way I am doing the TRUNK in this write up. There is no difference.
Still with me? Now we have all the physical links in place for firewall, switch and server. Let's dive into the server configuration.
This part of the setup is what slayed me for the longest time. So don't get all judgey when you experience the ease of it. My headache is being compiled for your success! ;)
I am going to assume.... no. No I am not. If you don't have Open vSwitch and KVM installed on your server, here are two links to accomplish that on a Rocky Linux 8 install. You may need to dig around for directions for your OS if your not using Rocky. Go get that done, and then return so we can continue on.
Install Open vSwitch
Install KVM / QEMU
Good to go?
The Crux
I am not using "Network Manager" (nmcli). OVS didn't work with NM when I first started. I think even today, it still uses "network-scripts" in some form or another for the ifup/ifdown functions. As of 07/07/2023, I have Network Manager installed but disabled, and am still using network-scripts for my network configurations. You should be able to use NM to accomplish the same things, but will need to investigate that yourself. It is out of scope for the write up.
In the order that works for me.
Layout your server network interfaces. None of the interfaces will have IP space attached to them, so the configurations are simple. If you look at my "rebuild-config.sh" (at the top of the page), you will notice just how simple and similar each part is. Lay them out according to YOUR needs.
Here are some points:
Management Interface Image

- The "management" interface (whichever port you choose that to be), should be configured as any other normal interface. You should be able to reach your server on this port without issues.
- Your physical network interface should have a HWADDR line with its MAC address defined. The UUID is used by Network Manager only, but I chose to just keep it in the configuration.
- The NAME line should be the same as the DEVICE line. Add it, if it missing.
- MTU is not required, unless you want to use Jumbo Frames and have it enabled/configured at the switch.
Physical Interfaces
Only the management interface is "special". Every other interface is going to be built exactly the same.
Using my setup as an example, I will reconfigure my 3 remaining physical network interfaces like so,
DEVICE=eth1
NAME=eth1
HWADDR=xx:xx:xx:xx:xx:xx
UUID=xxxxxxxx-xxxx-xxxx-xxxx-xxxxxxxxxxxx
ONBOOT=yes
BOOTPROTO=none
TYPE=Ethernet
HOTPLUG=no
MTU=9000
The only difference in the 3 physical interface configs will be the DEVICE, NAME, HWADDR, and UUID.
Bridge Interfaces
All and any new interfaces will be configured as "bridges" and will all be EXACTLY the same except for the DEVICE and NAME. They will be different from the physical interfaces because the will not have a HWADDR and UUID, and the TYPE will become "OVSBridge", in addition they will have the line "DEVICETYPE=ovs".
For each of the physical interfaces we created, now create a OVS bridge interface like so,
DEVICE=ovs1
NAME=ovs1
ONBOOT=yes
BOOTPROTO=none
TYPE=OVSBridge
DEVICETYPE=ovs
HOTPLUG=no
MTU=9000
All 3 will be exactly the same changing only the DEVICE and NAME.
VLAN Interfaces
VLAN interface configs are EXACTLY like Bridge Interfaces above. No difference. WTF you say?
We are creating OVS networks for use with a KVM implementation. You need to put aside any previous knowledge you may have about configuring VLANs inside linux (ifcfg-eth0.xxx). That is not the method when dealing with OVS. ;)
For each VLAN in your TRUNK create the config like so,
DEVICE=ext0
NAME=ext0
ONBOOT=yes
BOOTPROTO=none
TYPE=OVSBridge
DEVICETYPE=ovs
HOTPLUG=no
MTU=9000
Change only the DEVICE and NAME on each.
You should restart your server to make sure all your networks come up when the server boots. Or just restart networking and save a reboot for later (systemctl restart network).
That's it for server interfaces.
OVS Networks
OVS network configuration is pretty simple. I think the application is convoluted and documentation sucks! But, it works and for the most part we only need a couple commands, and to understand the terminology (because that's dumb too).
So using OVS is where we will attach the OVS Bridge interfaces to the Physical interfaces. The interface names that we use in our OVS commands, must match the the server interfaces we created. Create the OVS networks like so,
ovs-vsctl add-br ovs1
ovs-vsctl add-port ovs1 eth1
The first command creates the "ovs1" bridge and adds it to the OVS database. The second command adds the Physical server interface "eth1" as the port that the "ovs1" bridge will use.
We do the same thing for another interface that we want to directly attach to a bridge, like so,
ovs-vsctl add-br ovs2
ovs-vsctl add-port ovs2 eth2
So that covers creating the bridge and attaching the physical interface. This is all that is needed for just a bridge connection back to the switch on ports configured to be "access ports" (or whatever your switch calls them).
OVS VLAN Networks
Setting up the bridge interface that will handle VLANs takes a couple more commands. We still need to create the OVS bridge and add the physical port to the bridge. That is the same as above.
ovs-vsctl add-br ovs3
ovs-vsctl add-port ovs3 eth3
In order to incorporate the VLANs on this bridge, we use the following commands,
ovs-vsctl set port ovs3 trunk=310,320,330
ovs-vsctl add-br ext0 ovs3 310
ovs-vsctl add-br guest0 ovs3 320
ovs-vsctl add-br ioit0 ovs3 330
The bridges that are being created for each VLAN are called "FAKE BRIDGES". This is what threw me for a loop when I was trying to figure this out. I was not out looking for fake bridges. I was looking for how to configure a VLAN in OVS. I had noticed "fake bridge" being talked about, but that was not where my head went for VLANs. Hence, learning the ridiculous terminology might save a TON of wasted time.
To see these created networks you can use the ovs-vsctl show command,
ovs-vsctl showYou should see something similar to this,
ovs-vsctl show output
4ac8eca9-fd46-415d-acd7-02406d65ff5c
    Bridge ovs1
        Port ovs1
            Interface ovs1
                type: internal
        Port eth1
            Interface eth1
    Bridge ovs2
        Port ovs2
            Interface ovs2
                type: internal
        Port eth2
            Interface eth2
    Bridge ovs3
        Port ovs3
            trunks: [310, 320, 330]
            Interface ovs3
                type: internal
        Port eth3
            Interface eth3
        Port ext0
            tag: 310
            Interface ext0
                type: internal
        Port guest0
            tag: 320
            Interface guest0
                type: internal
        Port ioit0
            tag: 330
            Interface ioit0
                type: internal
    ovs_version: "3.1.2"
You should reboot the server and validate that all your settings are kept. Just performing a systemctl restart openvswitch is not a good test. I have ran into cases where just restarting the service worked file. But everything was all jacked up when I did a reboot. So be warned I guess.
And that is it for the OVS networks.
Define KVM Networks
I have found the easiest way to define the networks into KVM is by using a simple XML file. I have also found that when I need to update or change a already defined network, the easiest way is to delete the current network and just redefine it using the XML file. This is what makes the XML method handy... you have a backup! ;)
To define the first two bridge networks created above, I personally will create a XML file for each one. Like so,
cat > ./ovs1.xml << "EOF"
<network>
    <name>ovs1</name>
    <forward mode='bridge'/>
    <bridge name='ovs1'/>
    <virtualport type='openvswitch'/>
</network>

EOF


cat > ./ovs2.xml << "EOF"
<network>
    <name>ovs2</name>
    <forward mode='bridge'/>
    <bridge name='ovs2'/>
    <virtualport type='openvswitch'/>
</network>

EOF
This will create two XML files, "ovs1.xml" and "ovs2.xml" . Each one defines the network as a bridge, defines the name of the bridge, and also tells KVM that the network is part of "openvswitch".
In order to actually define these two networks into the KVM system, we would run the virsh net-define command on each file,
virsh net-define ovs1.xml

virsh net-define ovs2.xml
Defining the third bridge that holds the VLANs is the same. But the XML file has a bit more meat to it.
cat > ./ovs3.xml << "EOF"
<network>
 <name>ovs3</name>
 <forward mode='bridge'/>
 <bridge name='ovs3'/>
 <virtualport type='openvswitch'/>
 <portgroup name='novlan' default='yes'>
 </portgroup>
 <portgroup name='ext0'>
   <vlan>
     <tag id='310'/>
   </vlan>
 </portgroup>
 <portgroup name='guest0'>
   <vlan>
     <tag id='320'/>
   </vlan>
 </portgroup>
 <portgroup name='ioit0'>
   <vlan>
     <tag id='330'/>
   </vlan>
 </portgroup>
<portgroup name='OVS3TRUNK'>
   <vlan trunk='yes'>
     <tag id='310'/>
     <tag id='320'/>
     <tag id='330'/>
   </vlan>
 </portgroup>
</network>

EOF
The top part of the configuration is the same as the other two, but after that we need to define the "portgroup" information.
- The first posrtgroup is named "novlan" and is set as the default. If only "ovs3" is defined when creating a VM and portgroup or rather a VLAN will not be assigned.
- Next, for each VLAN we specify a new portgroup. Each with their "name" and a "tag id" (vlan number).
- The final "portgroup" section with the name "OVS3TRUNK", allows us to assign the entire TRUNK to a VM. Then once inside the VM we can manually configure the interface(s) to a VLAN.
Once the XML configuration is created, we would define the network the same way we did the others,
virsh net-define ovs3.xmlIn order to make these networks available they need to be started, and we can also set them to auto start when our host reboots.
# Start the networks
virsh net-start ovs1
virsh net-start ovs2
virsh net-start ovs3

# Set networks to auto start
virsh net-autostart ovs1
virsh net-autostart ovs2
virsh net-autostart ovs3
To see the status of the KVM networks we can use the "net-list" command,
virsh net-listShould see something like this,
virsh net-list output
 Name     State    Autostart   Persistent
-------------------------------------------
 ovs1     active   yes         yes
 ovs2     active   yes         yes
 ovs3     active   yes         yes
That is it!
That is how to configure your server for VLANs using Open vSwitch and making them work within KVM.
I hope this was helpful and saves you time digging around.
Additional Info
I have created another page that gives some detail on configuring these networks when building a VM or how to change an existing VM's network to these new networks. The Net
The Net
This will be a short write up on how to configure the networks I defined in The Crux write up. It should apply for most "bridge" centric builds. This is just more of a companion reference.
Virtual Machine Network Configuration (Install)
When creating a virtual machine on the CLI or if like me you create small script files and use virt-install,
virt-install \
--name sweetname \
--description "Awesome Rocky Server" \
--ram 16384 \
--disk path=/vsto/machines/sweetname.img,size=120 \
--cpu host \
--vcpus=4 \
--cpuset=auto \
--os-variant=rocky8.6 \
--accelerate \
--network bridge:br0 \
--graphics vnc,listen=0.0.0.0 \
--video virtio \
--cdrom /sto/vm/images/rocky-minimal.iso
The network line "--network bridge:br0" should be modified to use the new OVS bridge networks. From my testing if your configuring for a OVS bridge network that was setup on a access port (untagged port), then it does not appear to matter if you identify the type as either bridge or network. For example,
# BRIDGE
--network bridge:ovs1

# NETWORK
--network network:ovs1
The resulting XML that is created for the virtual machine (or 'domain' as they call it), does reflect your choice. So your 'interface' section of the XML could look like these examples,
# BRIDGE
    <interface type='bridge'>
      <source bridge='ovs1'/>
    </interface>

# NETWORK
    <interface type='network'>
      <source network='ovs1'/>
    </interface>
Either method appears to work.
However, when using a OVS bridge network that was setup on a trunk port (tagged port). We do need to use the network type, because we also need to identify the portgroup of the VLANs that were defined. In this case we would configure like so,
# NETWORK WITH VLAN
--network network:ovs3,portgroup=ext0
The XML for this configuration would look like this,
# NETWORK WITH VLAN
    <interface type='network'>
      <source network='ovs3' portgroup='ext0'/>
    </interface>
This configuration will put your machine on the specified VLAN.
Another option that can be added to the network configure line (there is actually a lot that can be configured but for the sake of this write up, I am sticking to options that pertain to OVS and will make things work) is virtualport_type=openvswitch. This option specifically tells the KVM system that this port is part of the OVS network. I am not sure of all the implications for using this option or not using it. However, I do like the idea of telling the configuration that it should use the OVS networks, and not something that could be configured elsewhere. This adds the following to the XML,
# ACCESS PORT (UNTAGGED) NETWORK
<interface type='network'>
      <source network='ovs1'/>
      <virtualport type='openvswitch'>
        <parameters interfaceid='xxxxxxxx-xxxx-xxxx-xxxx-xxxxxxxxxxxx'/>
      </virtualport>
    </interface>

# TRUNK (TAGGED) NETWORK WITH VLAN (PORTGROUP)
    <interface type='network'>
      <source network='ovs3' portgroup='ext0'/>
      <virtualport type='openvswitch'>
        <parameters interfaceid='xxxxxxxx-xxxx-xxxx-xxxx-xxxxxxxxxxxx'/>
      </virtualport>
    </interface>
For me, I prefer to use the network type for all my configurations and I also tag on the virtualport_type. This just allows for consistency (at least until I deep dive and fully understand all options and their purposes).
To sum up the install configuration for OVS networks, the following options work,
# ACCESS PORT (UNTAGGED) NETWORK
--network network:ovs1,virtualport_type=openvswitch

# TRUNK (TAGGED) NETWORK WITH VLAN (PORTGROUP)
--network network:ovs3,portgroup=ext0,virtualport_type=openvswitch
Virtual Machine Network Configuration (Post Install)
Above I have already shown examples of the XML that is created when creating a virtual machine. Here I will show how to modify those setting after a virtual machine is created or for existing machines that will be added to a OVS network.
BACKUP WARNING!
Create a backup of your virtual machines XML file before making any changes. Just in case something goes sideways.virsh dumpxml vm-name > vm-name.xml
TIME SAVER TIP!
Before shutting down your VM and changing your network settings within the XML. Change the IP information on your VM first so after saving your changes and starting your machine, it will come up on the new network.
First off you will want the virtual machine turned off. The XML of virtual machines are live and get edits when the machines are turned on. So to make a configuration stick (persistent), you will want to shut the machine down.
# GRACEFUL SHUTDOWN
virsh shutdown <vm name>

# FORCE SHUTDOWN
virsh destroy <vm name>
After the machine is shutdown we can edit the machines XML with the following,
virsh edit <vm name>The editor will use what is set as your systems default editor, or will default to using the VI editor.
Comb down through the XML config until you locate the <interface> element.
If the machine used a bridge that was setup prior to having OVS, the configuration may look like the following,
    <interface type='bridge'>
      <mac address='xx:xx:xx:xx:xx:xx'/>
      <source bridge='br0'/>
      <model type='virtio'/>
      <address type='pci' domain='0x0000' bus='0x01' slot='0x00' function='0x0'/>
    </interface>
We will want to modify the interface type within the element, the source, and also add the virtualport type. Like so,
    <interface type='network'>
      <mac address='xx:xx:xx:xx:xx:xx'/>
      <source network='ovs1'/>
      <virtualport type='openvswitch'/>
      <model type='virtio'/>
      <address type='pci' domain='0x0000' bus='0x01' slot='0x00' function='0x0'/>
    </interface>
This config example is using the "ovs1" network from The Crux write up. This network is connected to a access port (untagged), on my switch. So it does not require adding a portgroup (vlan) to the configuration.
Changing the network to a trunk port (tagged) and specifying the vlan (portgroup), is done the same way. We just need to add the portgroup to the source element. This example will use the "ovs3" network from The Crux write up, and the "ext0" vlan.
    <interface type='network'>
      <mac address='xx:xx:xx:xx:xx:xx'/>
      <source network='ovs3' portgroup='ext0'/>
      <virtualport type='openvswitch'/>
      <model type='virtio'/>
      <address type='pci' domain='0x0000' bus='0x01' slot='0x00' function='0x0'/>
    </interface>
Once that is complete, save the XML and turn your machine back on,
virsh start <vm name>That's it!
Hope this helps, and perhaps adds a little knowledge to your arsenal. :)