Don't Forget!
Various configurations and solutions to my life's problems.
Let's Encrypt
Setting up Let's Encrypt for SSL
CentOS, getssl, CloudFlare DNS
I am not going to go through a CentOS install (maybe later). However, below you will find my setup steps to get SSL functional using getssl (a script based on LetsEncrypt) and CloudFlare DNS (a DNS provider that offers a free service, that is quite awesome for being free). There is a lot of documentation out there, but finding the correct answer was a huge challenge (unless you know where to look). Here we go...
Install CentOS. Moving on.
I run my setup out of the /opt directory. Inside the /opt I create a ssl folder which will be considered the "working" directory. The GIT repo for getssl has a lot of scripts but I only needed a couple. The main getssl script and both the add and remove DNS scripts.
I put comments in the configs and scripts below. Look out for those, as they explain what some of the commands or variables do.
SITE: https://github.com/srvrco/getssl
Go to /opt, create the working directory, get the scripts and make them execute...
#!/bin/bash

cd /opt

mkdir ssl
mkdir ssl/scripts

# get main getssl script
wget https://raw.githubusercontent.com/srvrco/getssl/master/getssl
chmod +x getssl

# get the dns scripts needed to add and remove txt entries to your domain dns (for letsencrypt authorization)
wget https://raw.githubusercontent.com/srvrco/getssl/master/dns_scripts/dns_add_cloudflare -P /opt/ssl/scripts
wget https://raw.githubusercontent.com/srvrco/getssl/master/dns_scripts/dns_del_cloudflare -P /opt/ssl/scripts
chmod +x /opt/ssl/scripts/*
If this is a fresh install of linux, then the script will need a way to lookup DNS entries. I use "dig" from Bind. Install that.
yum install bind-utilsNow create the configuration files for your new domain that will use DNS for your SSL cert authentication. Note! This was the only method that could be used if I wanted to create a wildcard SSL (*.example.com). Also note... there are a thousand and one ways to get a SSL and even this getssl script has a crap ton of variables that can be modified (https://github.com/srvrco/getssl/wiki/Config-variables). I am showing you what I did. I don't care about other ways (if you have other ways... where were you when I was looking???).
Running getssl with a -h will give you a quick help list. Here is the command to generate your config files.
./getssl -c -w /opt/ssl example.com

# -c  creates new config files for the domain
# -w  indicates the working directory where the domain configs and ssl certs will reside
# example.com  the domain your setting up
It's going to spit out some jargon such as...
creating main config file /opt/ssl/getssl.cfg
Making domain directory - /opt/ssl/example.com
creating domain config file in /opt/ssl/example.com/getssl.cfg
Adding SANS=www.example.org,example.edu,example.net,example.org,www.example.com,www.example.edu,www.example.net from certificate installed on example.com to new configuration file
The main take aways from that is this. There is a getssl.cfg in /opt/ssl now. There is also a getssl.cfg inside the domain folder that it built /opt/ssl/example.com. We need to plug in some information inside these.
The file /opt/ssl/getssl.cfg looks like this...
# vim: filetype=sh
#
# This file is read first and is common to all domains
#
# Uncomment and modify any variables you need
# see https://github.com/srvrco/getssl/wiki/Config-variables for details
#
# The staging server is best for testing (hence set as default)
CA="https://acme-staging-v02.api.letsencrypt.org"
# This server issues full certificates, however has rate limits
#CA="https://acme-v02.api.letsencrypt.org"

# The agreement that must be signed with the CA, if not defined the default agreement will be used
#AGREEMENT=""

# Set an email address associated with your account - generally set at account level rather than domain.
#ACCOUNT_EMAIL="me@example.com"
ACCOUNT_KEY_LENGTH=4096
ACCOUNT_KEY="/opt/ssl/account.key"

# Account key and private key types - can be rsa, prime256v1, secp384r1 or secp521r1
#ACCOUNT_KEY_TYPE="rsa"
PRIVATE_KEY_ALG="rsa"
#REUSE_PRIVATE_KEY="true"

# The command needed to reload apache / nginx or whatever you use
#RELOAD_CMD=""

# The time period within which you want to allow renewal of a certificate
#  this prevents hitting some of the rate limits.
# Creating a file called FORCE_RENEWAL in the domain directory allows one-off overrides
# of this setting
RENEW_ALLOW="30"

# Define the server type. This can be https, ftp, ftpi, imap, imaps, pop3, pop3s, smtp,
# smtps_deprecated, smtps, smtp_submission, xmpp, xmpps, ldaps or a port number which
# will be checked for certificate expiry and also will be checked after
# an update to confirm correct certificate is running (if CHECK_REMOTE) is set to true
SERVER_TYPE="https"
CHECK_REMOTE="true"

# Use the following 3 variables if you want to validate via DNS
#VALIDATE_VIA_DNS="true"
#DNS_ADD_COMMAND=
#DNS_DEL_COMMAND=
We need to change the following lines...
### This is the staging server for testing...  comment this out
#CA="https://acme-staging-v02.api.letsencrypt.org"

# This is the real server...  uncomment this
CA="https://acme-v02.api.letsencrypt.org"

# Read the agreement then change the agreement line to this
AGREEMENT="https://letsencrypt.org/documents/LE-SA-v1.1.1-August-1-2016.pdf"

# Set an email address to associate with your account (use for your other domains too if you want).
# It does not have to be set. The default is ACCOUNT_EMAIL=""
ACCOUNT_EMAIL="me@example.com"

### I leave the rest default in this file.  I know there are DNS script fields,
### but I set those on a per domain bases.
Like the comment lines say above, I leave that file default for the most part. The DNS configs I run a per domain bases. Most of my domains use the normal http/https auth checks. But because I wanted a wildcard domain, I had to figure out DNS driven checks.
So, now we want to open the domain getssl.cfg file located in /opt/ssl/example.com. This file looks like this...
# vim: filetype=sh
#
# This file is read second (and per domain if running with the -a option)
# and overwrites any settings from the first file
#
# Uncomment and modify any variables you need
# see https://github.com/srvrco/getssl/wiki/Config-variables for details
# see https://github.com/srvrco/getssl/wiki/Example-config-files for example configs
#
# The staging server is best for testing
#CA="https://acme-staging-v02.api.letsencrypt.org"
# This server issues full certificates, however has rate limits
#CA="https://acme-v02.api.letsencrypt.org"

# Private key types - can be rsa, prime256v1, secp384r1 or secp521r1
#PRIVATE_KEY_ALG="rsa"

# Additional domains - this could be multiple domains / subdomains in a comma separated list
# Note: this is Additional domains - so should not include the primary domain.

SANS="www.example.org,example.edu,example.net,example.org,www.example.com,www.example.edu,www.example.net"

# Acme Challenge Location. The first line for the domain, the following ones for each additional domain.
# If these start with ssh: then the next variable is assumed to be the hostname and the rest the location.
# An ssh key will be needed to provide you with access to the remote server.
# Optionally, you can specify a different userid for ssh/scp to use on the remote server before the @ sign.
# If left blank, the username on the local server will be used to authenticate against the remote server.
# If these start with ftp: then the next variables are ftpuserid:ftppassword:servername:ACL_location
# These should be of the form "/path/to/your/website/folder/.well-known/acme-challenge"
# where "/path/to/your/website/folder/" is the path, on your web server, to the web root for your domain.
# You can also user WebDAV over HTTPS as transport mechanism. To do so, start with davs: followed by username,
# password, host, port (explicitly needed even if using default port 443) and path on the server.
        # Multiple locations can be defined for a file by separating the locations with a semi-colon.
#ACL=('/var/www/example.com/web/.well-known/acme-challenge'
#     'ssh:server5:/var/www/example.com/web/.well-known/acme-challenge'
#     'ssh:sshuserid@server5:/var/www/example.com/web/.well-known/acme-challenge'
#     'ftp:ftpuserid:ftppassword:example.com:/web/.well-known/acme-challenge'
#     'davs:davsuserid:davspassword:{DOMAIN}:443:/web/.well-known/acme-challenge')

# Specify SSH options, e.g. non standard port in SSH_OPTS
# (Can also use SCP_OPTS and SFTP_OPTS)
# SSH_OPTS=-p 12345

# Set USE_SINGLE_ACL="true" to use a single ACL for all checks
#USE_SINGLE_ACL="false"

# Location for all your certs, these can either be on the server (full path name)
# or using ssh /sftp as for the ACL
#DOMAIN_CERT_LOCATION="/etc/ssl/example.com.crt" # this is domain cert
#DOMAIN_KEY_LOCATION="/etc/ssl/example.com.key" # this is domain key
#CA_CERT_LOCATION="/etc/ssl/chain.crt" # this is CA cert
#DOMAIN_CHAIN_LOCATION="" # this is the domain cert and CA cert
#DOMAIN_PEM_LOCATION="" # this is the domain key, domain cert and CA cert

# The command needed to reload apache / nginx or whatever you use
#RELOAD_CMD=""

# Uncomment the following line to prevent non-interactive renewals of certificates
#PREVENT_NON_INTERACTIVE_RENEWAL="true"

# Define the server type. This can be https, ftp, ftpi, imap, imaps, pop3, pop3s, smtp,
# smtps_deprecated, smtps, smtp_submission, xmpp, xmpps, ldaps or a port number which
# will be checked for certificate expiry and also will be checked after
# an update to confirm correct certificate is running (if CHECK_REMOTE) is set to true
#SERVER_TYPE="https"
#CHECK_REMOTE="true"
#CHECK_REMOTE_WAIT="2" # wait 2 seconds before checking the remote server
I strip everything out of that file and just put what I need. This will be the file that I add the scripts to. It looks like this...
# vim: filetype=sh
#
# see https://github.com/srvrco/getssl/wiki/Config-variables for details

SANS="*.example.com"

VALIDATE_VIA_DNS="true"

AUTH_DNS_SERVER="1.1.1.1"       # Use this DNS server to check the challenge token has been set
PUBLIC_DNS_SERVER="8.8.8.8"     # Use this DNS server to find the authoritative DNS servers for the domain
CHECK_ALL_AUTH_DNS="false"      # Check the challenge token has been set on all authoritative DNS servers
CHECK_PUBLIC_DNS_SERVER="true"  # Check the public DNS server as well as the authoritative DNS servers

DNS_ADD_COMMAND="/opt/ssl/scripts/dns_add_cloudflare"
DNS_DEL_COMMAND="/opt/ssl/scripts/dns_del_cloudflare"
That is it for the getssl configuration. We do need to fill out some information in the DNS add/del scripts, so they know how to send and remove data.
In both the /opt/ssl/scripts/dns_add_cloudflare and the /opt/ssl/scripts/dns_del_cloudflare scripts, at the top we need to fill in the following values. These values pertain to your CloudFlare account. So you need to put in the email address you use to login to their system, and the Global key.
email="me@example.com"
key="yourlongassapikeyfromcloudflare"   #  This is the Global Key
In order to locate that key we need to head over to CloudFlare.
Once you have setup your domain on CloudFlare (moved your NS records over and yada yada), on the "Overview" page, on the right hand column down a little ways, you will see the API section.
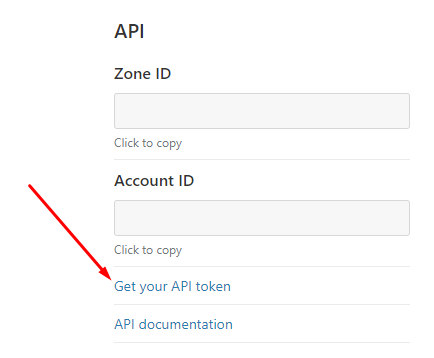
Click that "Get your API token" link.
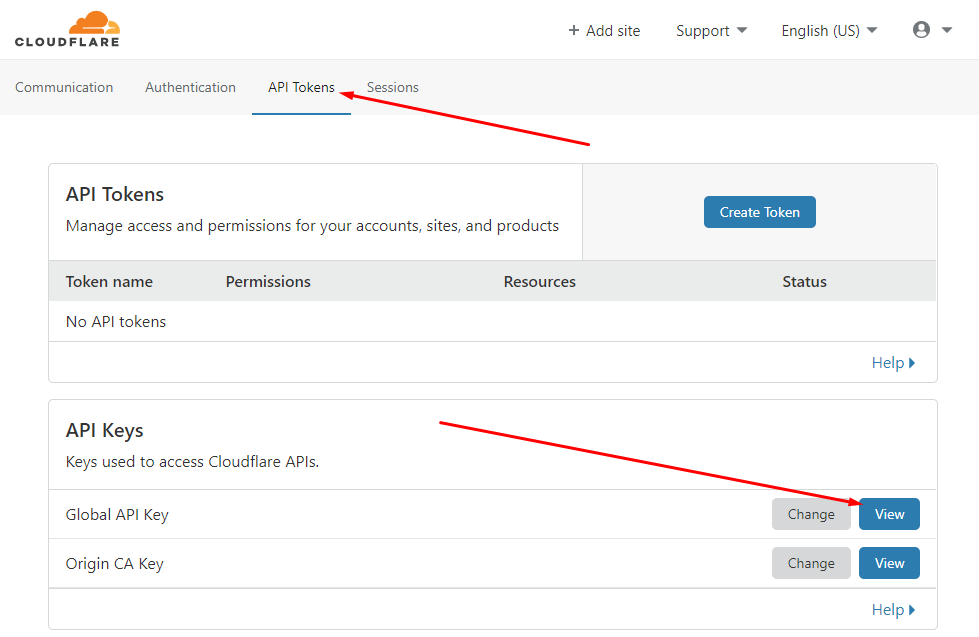
On the "Get your API token" page you will need to select the "API Tokens" link at the top, then select the "View" button for the "Global API Key".
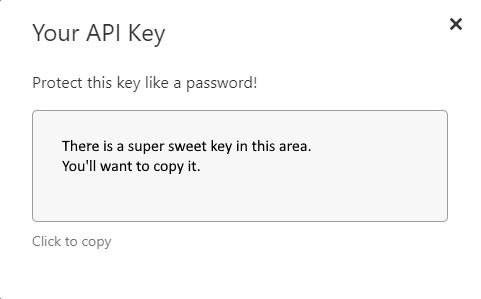
Put this key in your dns_add and dns_del scripts.
You can now test your scripts with the following syntax...
# To add a test TXT record to your domains DNS do this...
cd /opt/ssl/scripts
./dns_add_cloudflare example.com testing

# To del your test TXT record do this...
./dns_del_cloudflare example.com testing
When you add the TXT record, you should be able to see that record in your DNS entries on CloudFlare. It should look like this...

It should disappear when you run the dns_del script. If the scripts work, then you are cleared to get your SSL.
In order to request your cert, run the following command...
cd /opt
./getssl -w /opt/ssl example.com

# If perhaps you already have certs and are going for a wildcard or different name / sub name,
# you may need to force the check and overwrite your current certs.
./getssl -f -w /opt/ssl example.com
That is it.
You should see all you certs in the /opt/ssl/example.com directory and can now assign those to apache or whatever.
I wrote this for me, but if this helped you too... well... your welcome. :)
NOTES:
In the section where we added the scripts to the domain getssl.cfg, I added the DNS servers that I wanted checked.
AUTH_DNS_SERVER="1.1.1.1"       # Use this DNS server to check the challenge token has been set
PUBLIC_DNS_SERVER="8.8.8.8"     # Use this DNS server to find the authoritative DNS servers for the domain
CHECK_ALL_AUTH_DNS="false"      # Check the challenge token has been set on all authoritative DNS servers
CHECK_PUBLIC_DNS_SERVER="true"  # Check the public DNS server as well as the authoritative DNS servers
If I didnt add that section to the config, I found that the record would get added to DNS but the getssl script would start checking for that record using the internet root servers. It would never find that record in time. By directing the config to look for the TXT record at a source server (CloudFlare 1.1.1.1) and a public server (Google 8.8.8.8), the record was recognized right away.
DDNS
Some info regarding a DDNS setup.
DDNS with CloudFlare
So this is a pretty simple solution. It will actually take more time reading this, then actually setting it up.
To the point, shall we?
There are other solutions, but this was the method and scripts I used to accomplish this. I will be grabbing the GIT from https://github.com/adrienbrignon/cloudflare-ddns. Honestly, you could probably just follow the README.md found there and get everything working. I did. But I am hoping to take a little more of the guess work out of the picture with this guide.
This guide assumes you already have a domain's DNS being hosted by CloudFlare. I use CloudFlare's free plan and it works super good. I am really stoked about CloudFlare. The tools and services they provide for free is crazy. (Thank you CloudFlare!)
Anyway. Jump on your Linux box. I use CentOS (and will probably have to change soon), but this method should work for most NIX variants.
I will be grabbing the code and using /opt as the working directory. May need a couple tools too, so we will yum those.
Below we will use "pip" to install the requirements. If your on a fresh load of CentOS, you may want to install Python3. I recommend leaving the existing Python in place (mine was Python 2.7) and just running "yum install python3". Then I went ahead and linked pip3 to pip by doing a "ln -s /usr/bin/pip3 /usr/bin/pip". Should be good to go after that.
yum install bind-utils git python

cd /opt

git clone https://github.com/adrienbrignon/cloudflare-ddns.git cfddns
chown -R root.root cfddns

cd /opt/cfddns
chmod +x cloudflare-ddns.py

# install the requirements - they are pyyaml and requests
pip install -r requirements.txt
That should do it for getting the code and installing requirements. Now we need to configure the yml for the domain. Most of the work is already done. We just need to follow suit.
cd zones

mv example.com.yml yourdomain.com.yml

vi yourdomain.com.yml
Edit yourdomain.com.yml
%YAML 1.1
# Cloudflare DDNS example configuration
---

# Your Cloudflare user/email address
cf_email: 'username@cloudflare.com'

# Your Cloudflare API key
# https://support.cloudflare.com/hc/en-us/articles/200167836-Where-do-I-find-my-Cloudflare-API-key
cf_api_key: <your cloudflare api key goes here>

# Cloudflare zone name
# If you're updating 'ddns.example.com' set this to 'example.com'
cf_zone: yourdomain.com

# List of records
# If you're updating 'example.com' record, set its name to '@'.
# Only write the subdomain ('ddns' for 'ddns.example.com')
cf_records:
    - 'www':
        type: A
        proxied: true
    - 'test':
        type: A
        proxied: true
    - 'stuff':
        type: A
        proxied: true
    - 'smoke':
        type: A
        proxied: true
    - 'mirror':
        type: A
        proxied: true

### some additional examples
#    - '@':
#        type: A
#        proxied: true
#        log: ERROR
#    - 'ddns':
#        type: A
#    - 'ddns':
#        type: AAAA
#        ttl: 300
#        proxied: false
#        log: INFO

# This is the method used to discover the server's IP address
# The faster one is 'dig' but it may not be available on your system
# Available methods: 'http' or 'dig'
cf_resolving_method: 'dig'
Ok... now we need to find that API key on CloudFlare... (stealing the next bit from a previous write up)
On the "Overview" page of your domain on CloudFlare, on the right hand column down a little ways, you will see the API section.
Click that "Get your API token" link.
On the "Get your API token" page you will need to select the "API Tokens" link at the top, then select the "View" button for the "Global API Key".
Put this key in the yourdomain.com.yml file.
Configuration is done. Now we just test and make sure we get no errors.
python /opt/cfddns/cloudflare-ddns.py -z yourdomain.com

# should see something along these lines...
2020-12-21 14:43:21,561 | INFO | The record 'www.yourdomain.com' (A) is already up to date
2020-12-21 14:43:21,561 | INFO | The record 'test.yourdomain.com' (A) is already up to date
2020-12-21 14:43:21,561 | INFO | The record 'stuff.yourdomain.com' (A) is already up to date
2020-12-21 14:43:21,562 | INFO | The record 'smoke.yourdomain.com' (A) is already up to date
2020-12-21 14:43:21,562 | INFO | The record 'mirror.yourdomain.com' (A) is already up to date
Test is good. Now set the cron job. Add the following to your crontab. This will check and update your DNS every 30 minutes.
vi /etc/crontab

# Every 30 minutes, update Cloudflare records.
*/30 * * * * python /opt/cfddns/cloudflare-ddns.py -z yourdomain.com
And that is it.
Happy DDNS'ing!!
One Liners And Things
I guess, moving forward I should start putting all my quick commands I find into a collection. Rather then thinking I can remember them. That thinking fails me more often than not, and I find myself searching the world again for that one thing that worked.
This will be my avenue for self preservation.
Remove SELINUX context from all files (the dot):
find / -exec setfattr -h -x security.selinux {} \;
Move the last 1000 files to a different location:
ls -a1 | tail -n1000 | xargs -i mv {} ./location
Count the number of files in a directory:
ls | wc -l
AWK out some characters:
little test script...
cat > test.sh << "EOF"
#!/bin/bash
DSK=$(findmnt -n -o SOURCE /boot | awk '{ print substr($0,1,8) }')
printf "\n${DSK}\n\n"
EOF
The print substr is looking at (string, start, count).
$0 (provided string), 1 (starting point in the string), 8 (how many more to display after the starting point)
This will grow...